


Home canning isn’t just a hobby for the nostalgic or the overly cautious prepper; it’s a powerful method of food preservation that turns fresh produce into shelf-stable sustenance. Imagine biting into summer-ripe tomatoes or homemade pickles deep in winter—or relying on these preserved staples when grocery shelves look more like a barren wasteland than a well-stocked market.
Here is where you can find an in-depth list and detailed review of all the essential equipment required for successful home canning. The article covers a wide range of tools and supplies necessary to ensure a smooth and efficient canning process. From jars and lids to canners and utensils, every aspect of home canning equipment is thoroughly discussed to help you make informed decisions for your food preservation needs. Whether you’re a beginner looking to start your canning journey or an experienced preserver seeking to upgrade your tools, this comprehensive guide has you covered.
The secret to successful home canning lies in having the right equipment. Without proper tools, what should be a straightforward process morphs into a frustrating mess, or worse—a health hazard. Canning demands precision, from sterilized jars to reliable sealing methods, making equipment choice non-negotiable.
This article offers a no-nonsense equipment overview designed for anyone serious about getting started with home canning. Whether you’re prepping for self-reliance or simply craving control over your pantry, you’ll find the essentials unpacked here—because good canning starts with knowing your gear. For those who are new to this process, it’s important to follow a basic cooking and canning checklist to ensure everything goes smoothly.
Understanding Home Canning
When it comes to home canning, it’s important to understand the difference between high-acid foods and low-acid foods. This distinction plays a crucial role in determining the appropriate canning method to use for preserving these foods.
High-Acid Foods vs. Low-Acid Foods
High-acid foods are those that have a natural acidity level of 4.6 or lower. These foods include fruits, tomatoes, pickled vegetables, and certain types of jams and jellies. The acidity in these foods helps inhibit the growth of bacteria, making them safer to preserve using a water bath canning method.
On the other hand, low-acid foods have an acidity level above 4.6. This category includes most vegetables, meats, poultry, and fish. Since low-acid foods are more susceptible to bacterial growth, they require a different canning process known as pressure canning to ensure their safety during preservation.
Canning Processes Based on Acidity Levels
There are two main canning processes used based on the acidity levels of the food being preserved:
- Water Bath Canning: This method is suitable for high-acid foods. It involves submerging jars filled with prepared high-acid foods in boiling water for a specific period of time. The heat from the boiling water kills off any bacteria present in the jars and creates a vacuum seal as the jars cool down.
- Pressure Canning: Low-acid foods require this method for safe preservation. Pressure canning involves using a specialized pressure cooker orcanner that reaches higher temperatures than boiling water alone can achieve. The increased temperature effectively destroys bacteria spores that may be present in low-acid foods.
By understanding these differences between high-acid and low-acid foods, as well as their corresponding canning processes, you can ensure that your home canned goods are safe and delicious!
Essential Equipment for Home Canning
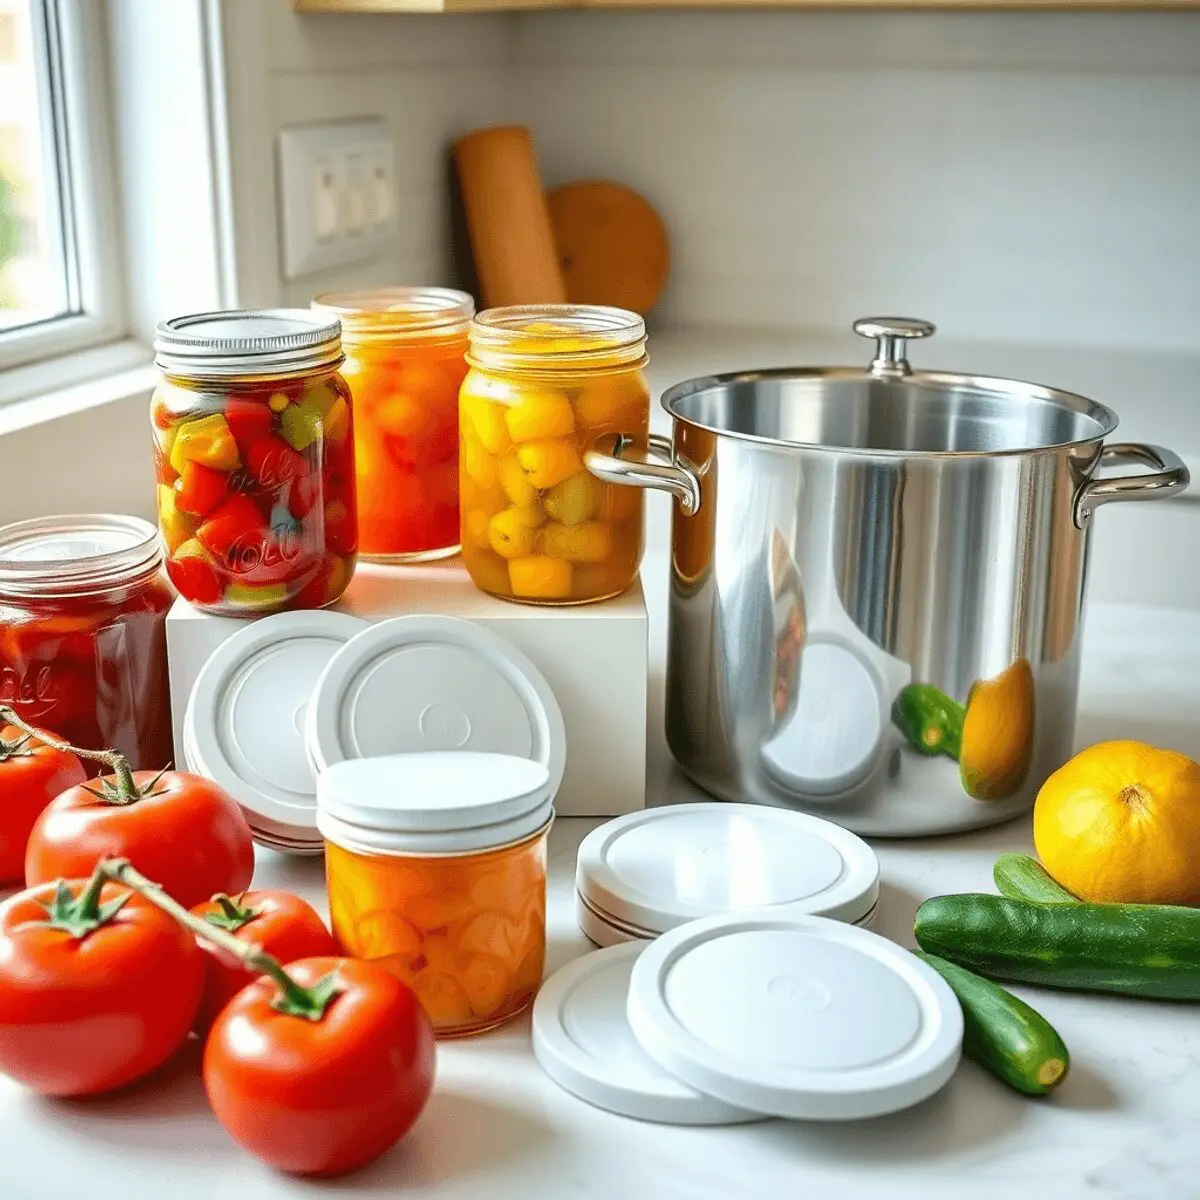
Canning Jars
Canning Jars are the backbone of home canning, and Mason jars are the most popular choice due to their durability and versatility. Available in various sizes like quart, pint, or half-pint, they are perfect for preserving a wide range of foods from jams to pickles. The screw-on lids create an airtight seal essential for safe preservation.
Water Bath Canner
A water bath canner is a large pot with a tight-fitting lid and a rack to hold jars off the bottom. It is specifically designed for high-acid foods like fruits, tomatoes, and pickles. The boiling water creates a hot water bath that surrounds the jars, heating them evenly and killing any bacteria present to prevent spoilage.
Pressure Canner
On the other hand, a pressure canner is necessary for low-acid foods such as meats, poultry, seafood, and vegetables. Unlike a water bath canner, a pressure canner uses steam under pressure to reach higher temperatures than boiling water, effectively destroying harmful microorganisms like botulism spores that thrive in low-acid environments.
Understanding when to use each type of canner is crucial for successful home canning. While high-acid foods can be safely preserved using a water bath canner due to their natural acidity, low-acid foods require the higher temperatures achievable only with a pressure canner to ensure safe consumption. Investing in both types of canners expands your home canning possibilities and guarantees the safety of your preserved goods.

Additional Tools and Utensils You Might Need
When starting your journey into home canning, having the right tools can make the process smoother and more efficient. Here are some essential tools and utensils you might want to consider adding to your home canning collection:
- Jar Lifter: This handy tool is designed to safely lift hot jars in and out of the canner without risking burns or spills. It provides a secure grip on the jars, making the handling process much easier.
- Funnel: A funnel is a must-have for transferring hot liquids or foods into jars without creating a mess. It ensures that your precious preserves end up in the jar and not on the countertop.
- Bubble Freer: Removing air bubbles trapped inside filled jars is crucial to ensure proper sealing. A bubble freer helps release these air pockets, preventing potential spoilage and ensuring airtight preservation.
- Lid Wand: When working with hot lids, a lid wand comes in handy for lifting them safely out of hot water without risking contamination. It allows for easy placement of lids onto jars before processing.
These additional tools complement your basic canning equipment, enhancing your efficiency and success in home canning endeavors. As you gather your supplies, consider adding these tools to your collection for a seamless canning experience.
Pantry Supplies for Successful Home Canning
When it comes to home canning, having the right pantry supplies on hand can make all the difference. These ingredients not only enhance the flavors of your preserves but also ensure safety and extend their shelf life. Here are some common pantry ingredients used in home canning:
1. Pectin
Pectin is an essential ingredient for gelling jams and jellies, ensuring the right consistency and texture in your preserves. It’s particularly useful when working with low-pectin fruits or when you want to achieve a specific gel point.
2. Lemon Juice
Lemon juice plays a crucial role in acidity control, especially when canning low-acid foods. The acidity helps prevent the growth of harmful bacteria, making it an important component for safe preservation.
3. Vinegar
Vinegar is a key ingredient for pickling, providing the tangy flavor that complements fruits or vegetables. It also acts as a preservative by creating an acidic environment that inhibits bacterial growth.
4. Sugar/Honey
Sweetening options like sugar or honey not only add sweetness to your canned goods but also serve as preservatives. Sugar, in particular, helps inhibit bacterial growth in canned fruits, ensuring their longevity.
These pantry supplies work hand in hand with your canning process, enhancing flavors, ensuring safety, and extending the shelf life of your homemade preserves. Before you begin your canning operation, it’s essential to have these items readily available:
- Pectin
- Lemon juice
- Vinegar
- Sugar or honey
By incorporating these essential pantry supplies into your home canning routine, you set yourself up for flavorful and safe preserved foods that can be enjoyed throughout the year.
Safety Tips to Keep in Mind While Canning at Home
When it comes to home canning, safety should be your top priority. Here are some essential tips to keep in mind:
Use Approved Jars
It’s crucial to use approved jars and new lids for preservation. This ensures that your canned goods are safe for consumption and have a longer shelf life.
Clean Your Equipment Properly
Proper cleaning and maintenance practices for canning equipment are vital to avoid contamination. Always ensure that your jars, lids, and other equipment are thoroughly cleaned before use.
Follow Tested Recipes
The significance of following tested recipes from reliable sources cannot be stressed enough. These recipes provide the correct measurements and methods required for successful and safe home canning.

Getting Started with Home Canning: A Step-by-Step Guide
Home canning is a rewarding way to preserve your favorite foods and enjoy them year-round. However, it’s essential to prepare properly to ensure the safety and quality of your canned goods. In this guide, we’ll walk you through the necessary steps to get started with home canning.
1. Gather Your Equipment
Before you begin, make sure you have all the necessary equipment for canning. This includes:
- Canning jars with lids
- A large pot or canner
- A jar lifter
- A funnel
- A food processor or blender (if needed)
- Any additional tools specific to your recipe
2. Wash Jars and Lids
Start by thoroughly washing your jars and lids in hot soapy water. Rinse them well to remove any soap residue. Alternatively, you can run them through a dishwasher cycle for added convenience.
3. Sterilize Equipment
To prevent any bacteria from interfering with the canning process, it’s crucial to sterilize your equipment. Boil your jars and lids in a large pot of water for at least 10 minutes. This will kill any remaining germs and ensure a safe environment for preserving food.
4. Prepare the Food
While your jars and lids are being sterilized, take this time to prepare the food you plan on canning. Wash, peel, chop, or cook the ingredients as necessary according to your chosen recipe.
5. Maintain Cleanliness Throughout
Throughout the entire canning process, cleanliness is key. Make sure to wash your hands thoroughly before handling any food items or equipment. Wipe down surfaces with disinfectant regularly to minimize the risk of contamination.
6. Pay Attention to Detail
Achieving a good seal on jars is crucial for long-term storage and preventing spoilage. Follow these tips:
- Use new lids for each batch of canned goods
- Ensure there are no cracks or chips on jar rims
- Leave appropriate headspace as specified in recipes
Additionally, follow proper processing times based on altitude adjustments if necessary.
By following these preparation steps diligently and maintaining cleanliness throughout the process, you’ll be well on your way to successful home canning!

Canning Pot with Rack and full Set + ½ Pint ladle Measuring Cups - Supplies Kit for Beginner, Food Grade Stainless Steel Accessories Starter
Conclusion: Embrace the Art of Home Canning!
Home canning offers a fulfilling journey where you can savor delicious preserved foods all year round. It’s not just about preservation; it’s about creating memories and flavors that last.
Like any craft, home canning rewards practice and patience. With each batch, you hone your skills and develop a deeper understanding of the process, leading to tastier outcomes.
To kickstart your home canning adventure, here are some affiliate links to get you started:
- Canning Jars
- Water Bath Canner
- Pressure Canner
- Jar Lifter
- Funnel
- Bubble Freer
- Lid Wand
Remember, getting started with home canning is not just about preserving food; it’s about embracing a lifestyle of self-reliance and creativity in the kitchen. Happy canning!